Yes, you can edit video with Google Antigravity on a Mac (macOS 13+) or Windows PC (Windows 10+ x64) by installing the ChatCut plugin, which connects Antigravity’s Gemini models to ChatCut Desktop so every cut, caption, motion graphic, and audio layer lands on a real multi-track timeline. On its own, Antigravity can write scripts or run terminal commands, so practical Antigravity video editing depends on pairing the agent with a visual timeline editor you can inspect and adjust by hand. We tested the complete workflow on macOS using Antigravity CLI (agy 1.5.9) with Gemini 4 Carbon (High) and the chatcut-desktop plugin, turning a 33.5-second 4K studio presenter take and live chatcut.io product pages into a finished 22.7-second product demo tutorial.
Watch the finished product-demo cut we built in Antigravity
Every frame in the exported video below came from one Antigravity session connected to ChatCut’s AI video editor on desktop:
Here is what happens across the 22.7-second timeline:
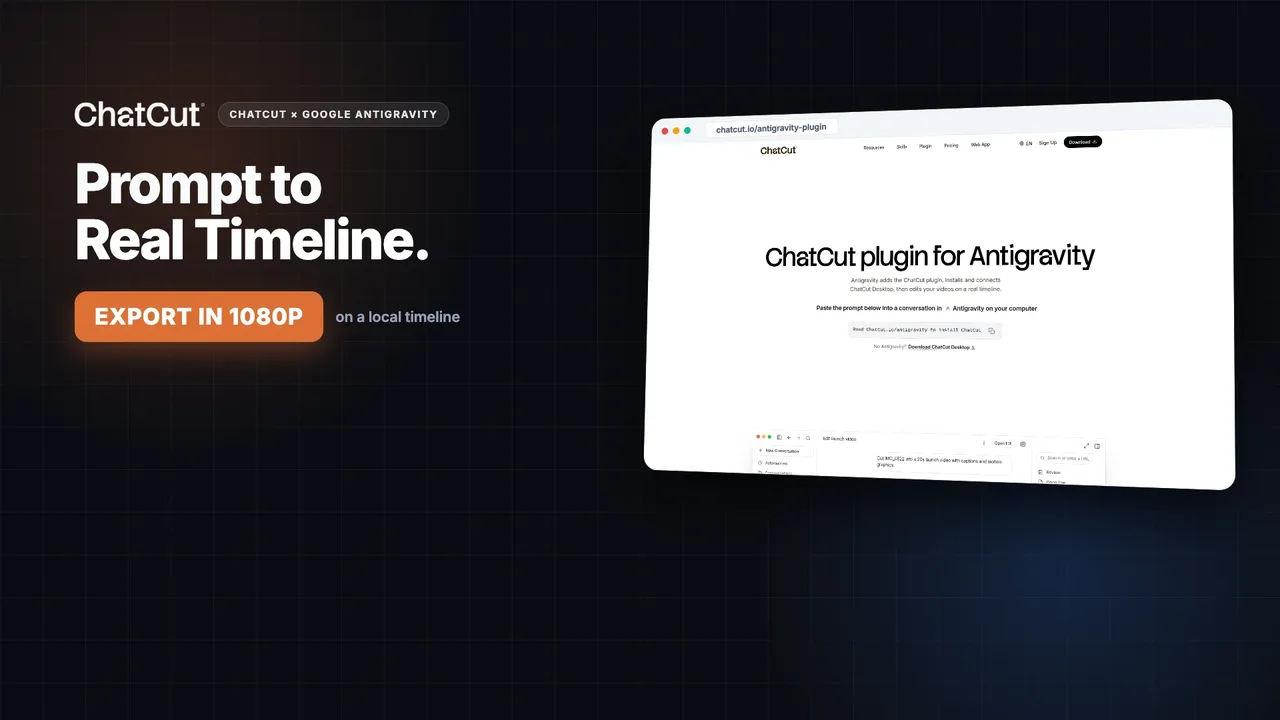
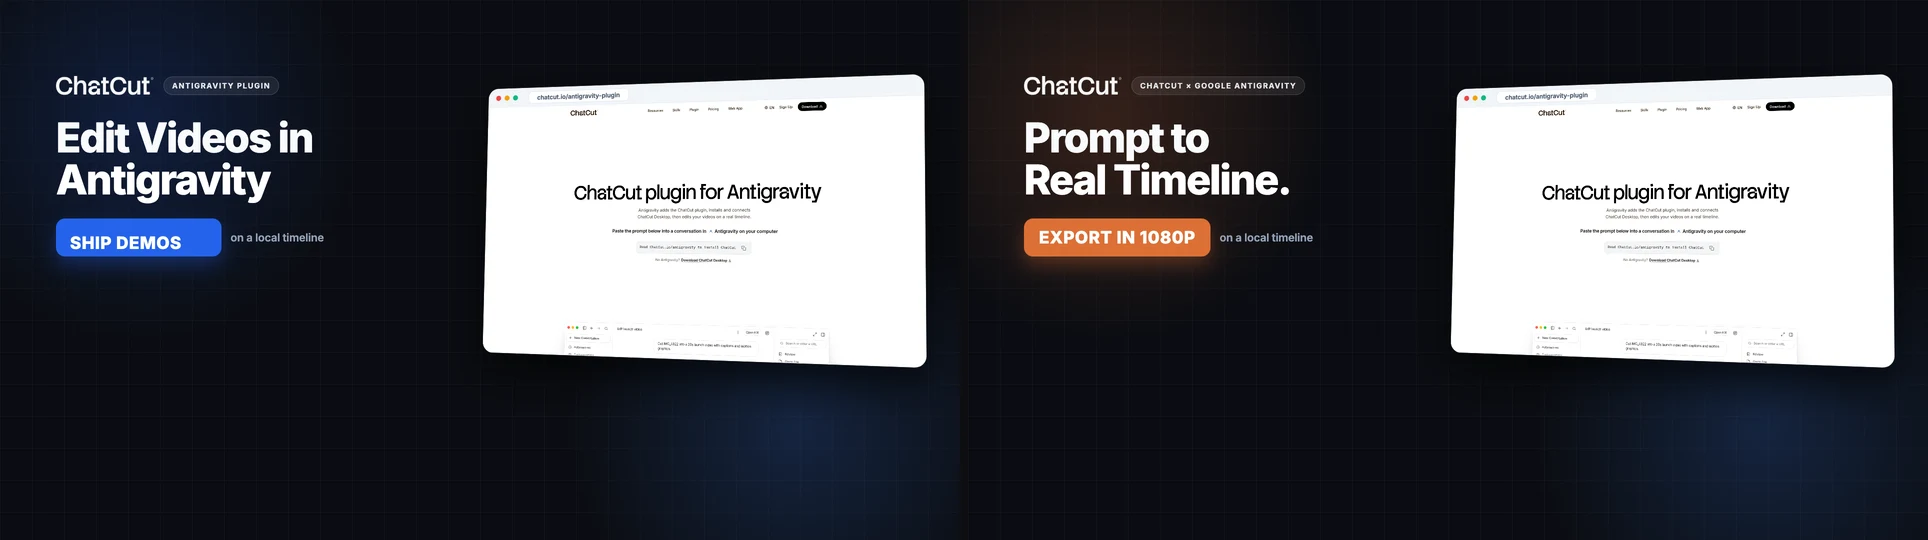
- 0:00 to 0:03 (App Promo kinetic opener): A dark-grid launch card built from our project Design Style and a 3D perspective screenshot of
chatcut.io/antigravity-plugin, refined through two chat rounds. - 0:03 to 0:08 (A-Roll rough cut and word-level captions): Our 4K presenter recording trimmed down from 33.5 seconds of false starts and pauses, paired with high-contrast dark-pill captions and warm orange active-word highlights.
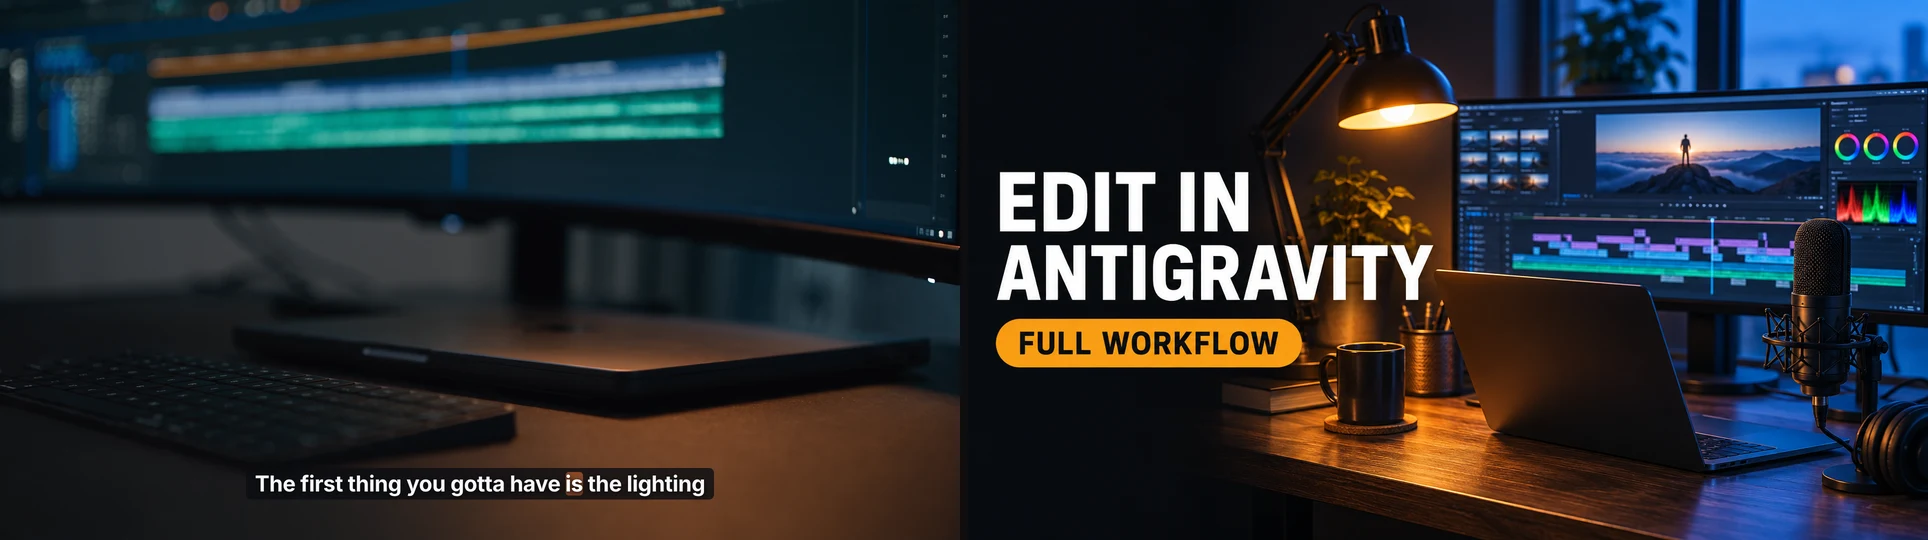
- 0:08 to 0:13 (Generated B-Roll cutaway): A 5-second 1080p studio desk shot generated with Seedance 2.5 bridging a spoken jump cut while the presenter’s voice continues underneath.
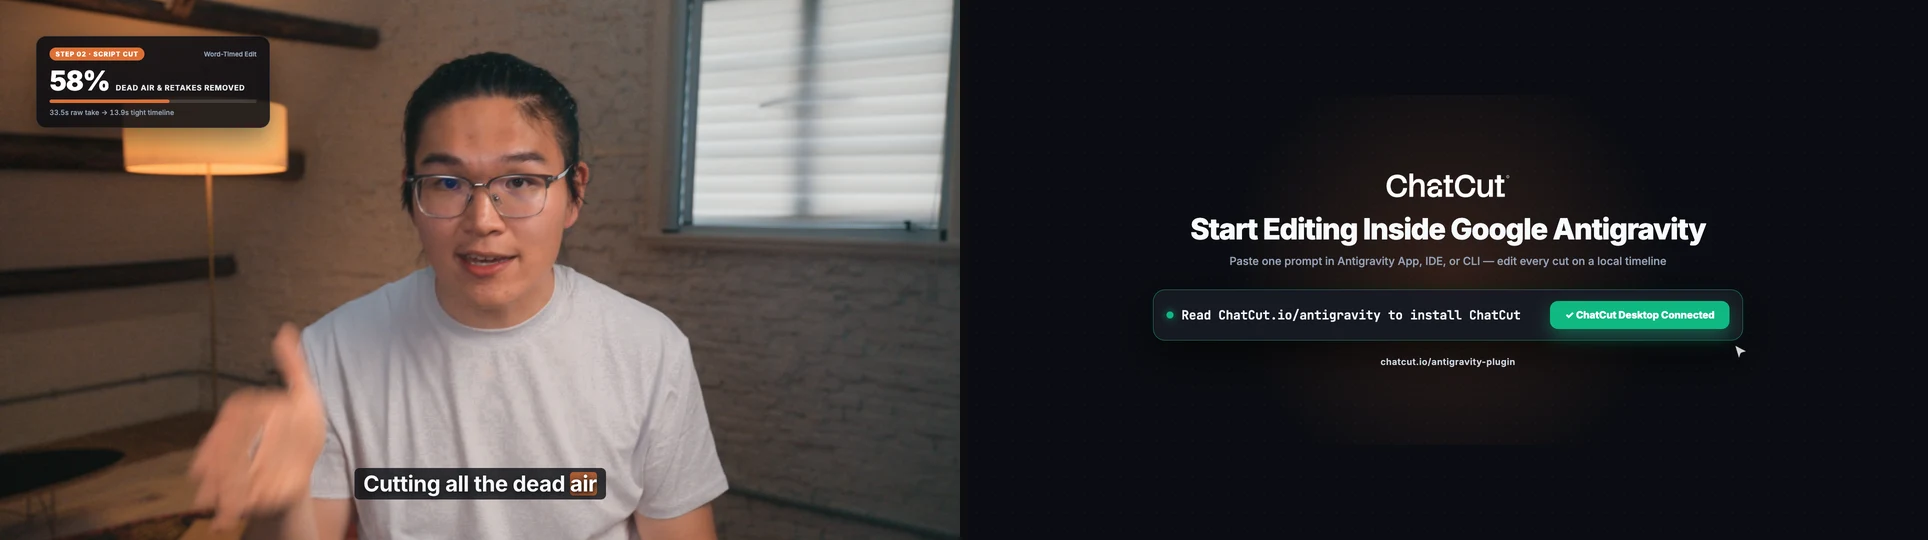
- 0:13 to 0:17 (Punch-in zoom and metric callout): A 1.16x punch-in zoom on the 4K camera file paired with a transparent App Promo badge (
58% DEAD AIR & RETAKES REMOVED) and a subtle transition whoosh. - 0:17 to 0:22 (Interactive CTA outro, AI voiceover, and auto-ducked music): A cursor-click install prompt narrated by a generated English voiceover over an instrumental synth pulse that ducks automatically whenever someone speaks.
Quick start: edit a video in Antigravity in five steps
- Install and connect ChatCut. Open Google Antigravity on your desktop and send
Read ChatCut.io/antigravity to install ChatCutto install ChatCut Desktop, register thechatcut_desktopMCP server, and load ChatCut’s workflow skills. - Import your footage and brand assets. Create a project, bring in your camera or screen recording, wait for word-timed transcription, and optionally pull colors, logos, and screenshots from your product URL into a Design Style.
- Lock the A-Roll first. Cut retakes and dead air from the transcript, fix proper nouns and styling on word-level captions, and add restrained punch-in zooms or transitions.
- Layer B-Roll on top. Add App Promo Motion Graphics, generate any missing B-roll shots or thumbnails after checking credit estimates, and place auto-ducked music or voiceover on separate audio tracks.
- Inspect frames and export locally. Review cuts, captions, graphics, and loudness on the timeline, then render an MP4 locally on your machine or export an XML timeline for Premiere Pro or DaVinci Resolve.
What you need before you start
Most Antigravity plugins connect code repositories, cloud APIs, or documentation search. Adding ChatCut for Antigravity installs two local pieces that share ~/.gemini/config/: the chatcut_desktop MCP server (dozens of timeline, transcript, caption, generation, and export tools) and about 30 workflow-specific Antigravity skills that teach the agent how to pace speech cuts, inspect rendered frames, and mix dialogue with music.
Check four prerequisites before starting:
- macOS 13+ or Windows 10+ (x64) with a graphical desktop. ChatCut Desktop renders timelines locally on your computer (ChatCut Product Facts). Linux, headless Docker containers, and remote SSH sessions cannot run ChatCut Desktop.
- Google Antigravity (App, IDE, or
agyCLI) on an eligible account. You can run prompts in the Antigravity App, the IDE chat panel, or theagyterminal CLI (Google’s Workspace MCP codelab directs former Gemini CLI users to Antigravity CLI; see the Antigravity documentation for initial setup). In our November 2026 test (agy1.5.9),agy modelsoffered Gemini 4 Carbon, Gemini 4 Argon, Gemini 4 Hydrogen, and Gemini 3.8 Flash alongside optional third-party models. If Antigravity reports “not currently available in your location”, stop there because regional account restrictions cannot be bypassed. - A ChatCut account and clear billing expectations. Sign in once inside ChatCut Desktop so cloud speech transcription and template libraries work. When you drive ChatCut from Antigravity, your Google Antigravity allowance covers the agent’s reasoning, while ChatCut’s Free plan covers local timeline cuts, transcription, standard captions, agent-authored Motion Graphics, and local MP4 or XML exports for 0 ChatCut credits (Credits policy). ChatCut credits are spent only when you request hosted AI video (paid plan required), image, voiceover, or music generation; our four optional generations in Steps 7 and 8 totaled 13.94 credits.
- Local source files and disk space. Your
.chatcutprojectpackage, imported camera recordings, and exported videos stay on your computer’s local drive rather than uploading an entire raw camera card to a web browser.
A-Roll and B-Roll: why staged prompts beat one giant prompt
Product demos and tutorial videos hold together best when you separate the edit into two stages.
A-Roll is the spoken spine of the tutorial: the presenter or narrated screen walkthrough saying the right lines in the right order without stumbles or dead air. B-Roll is every visual and sonic layer placed around that spine to clarify the point: kinetic product title cards, UI screenshots, metric badges, cutaway footage, background music, and closing voiceover.
Asking an agent to cut retakes, style captions, build motion graphics, generate B-roll, and mix music in a single mega-prompt makes mistakes hard to isolate. If a caption overlaps a title card or a cutaway lands on a clipped word, you end up redoing half the project. Steps 2 through 5 below lock the A-Roll first; Steps 6 through 9 add B-Roll and deliver the finished file.
How to edit video with Google Antigravity step by step
1. Install ChatCut in Antigravity and verify the connection
ChatCut installs into Antigravity from the official setup guide at ChatCut.io/antigravity rather than requiring manual JSON edits. Open the Antigravity App, IDE chat, or an agy terminal session and send this single prompt:
Approve the setup commands if your terminal policy asks for confirmation. Antigravity installs chatcut-desktop from the antigravity-desktop plugin subdirectory, downloads ChatCut Desktop if needed, registers chatcut_desktop via agy mcp add, and links ChatCut’s workflow skills into ~/.gemini/config/skills. Sign in once when ChatCut Desktop opens, then start a new conversation so Antigravity loads the newly registered MCP tools.
In our macOS terminal check, agy confirmed both the plugin and the local MCP bridge were active:
$ agy --version
1.5.9

$ agy plugin list --json
[
  {
    "name": "chatcut-desktop",
    "enabled": true,
    "version": "1.0.0",
    "source": "antigravity",
    "skills": [
      "connect-chatcut-desktop"
    ]
  }
]

$ agy mcp list
NAME             TYPE   STATUS   COMMAND/URL
chatcut_desktop  stdio  enabled  ~/Library/Application Support/ChatCut/chatcut-mcp
Because the Antigravity App, IDE, and agy CLI read the same ~/.gemini/config/ files, installing once makes ChatCut available across all three surfaces:
| Surface | Where to check connection status | What confirms it is ready |
|---|---|---|
| Antigravity App | Open Customizations -> Installed MCP Servers and start a new chat | chatcut_desktop shows enabled and responds to project queries |
Antigravity CLI (agy) | Run agy plugin list and agy mcp list | chatcut-desktop and chatcut_desktop (stdio) both show enabled |
| Antigravity IDE | Open the Agent panel -> MCP Servers (refresh if needed) | chatcut_desktop tools load in a fresh workspace session |
2. Import your recording and capture real product brand assets
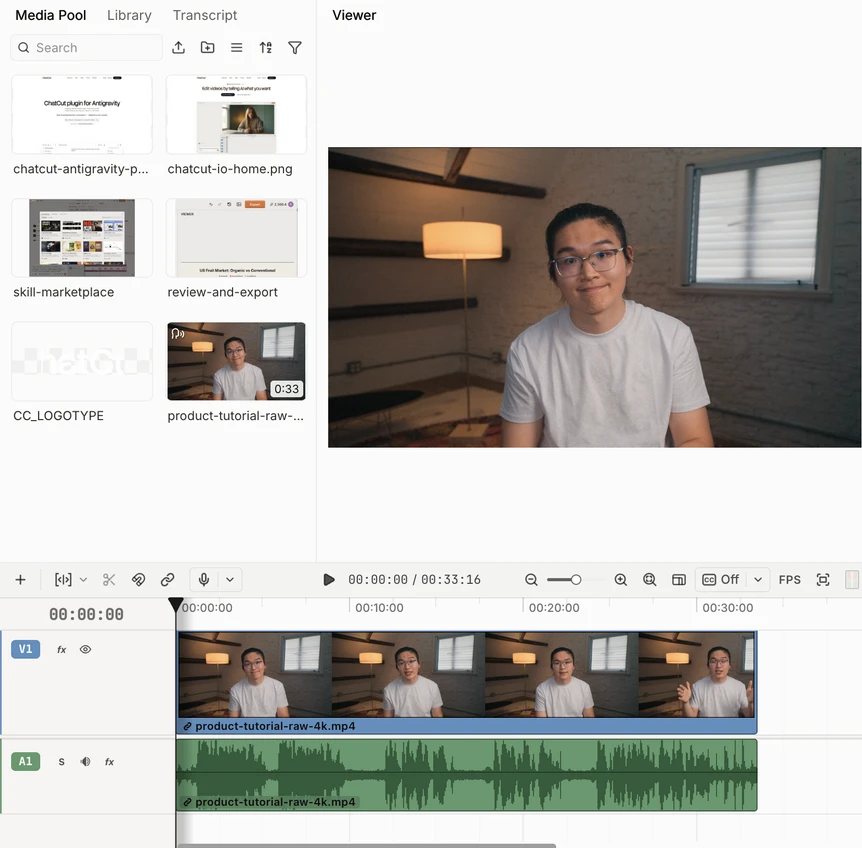
With a fresh conversation open, we asked Antigravity to create a 1920×1080 30 fps project, import our 33.5-second 4K studio presenter clip (product-tutorial-raw-4k.mp4), transcribe the speech, and pull real brand tokens and screenshots from chatcut.io and chatcut.io/antigravity-plugin:
Antigravity created the local project package (~/Library/Application Support/ChatCut/projects/<project-id>/project.chatcutproject on macOS), placed the 33.5-second 4K clip onto the timeline, completed word-timed English transcription, and saved a project Design Style featuring ChatCut’s warm orange primary accent, dark canvas palette, typography roles, wordmark, and clean product page screenshots.
3. Cut the A-Roll: remove false starts, retakes, and dead air
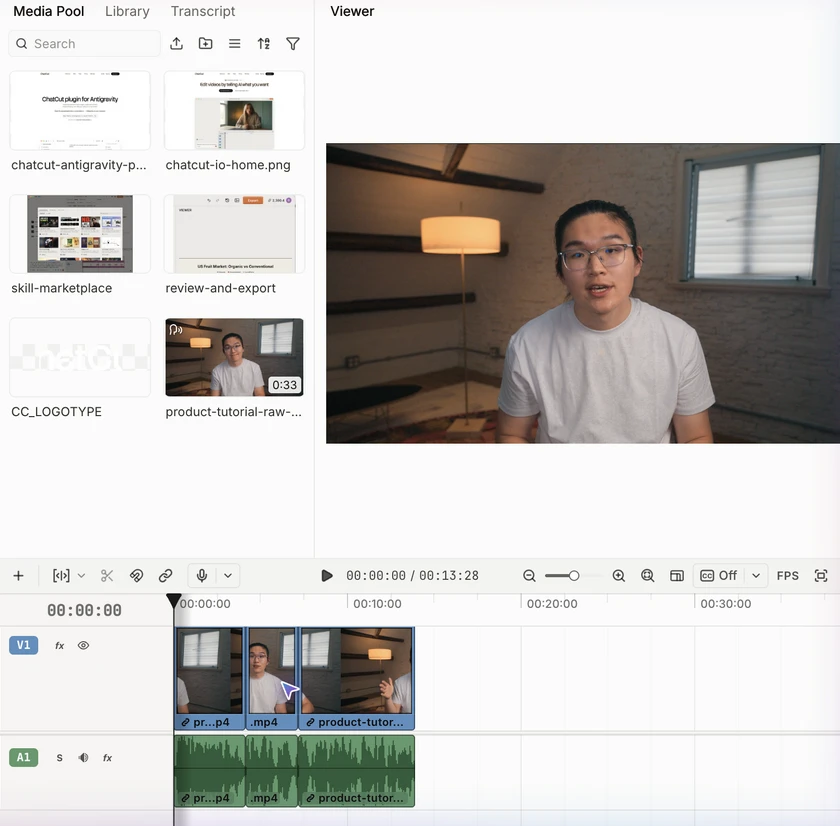
Our raw 33.5-second recording included two attempts at the opening hook, a mid-sentence restart (“The first thing. The first thing you gotta have…”), two multi-second pauses, and an off-camera check-in with the studio crew at the end (“How did that sound? Pretty solid?”). We asked Antigravity to cut the A-Roll directly from the word-timed transcript:
Antigravity struck the discarded takes and pauses from the transcript and rippled the timeline down to three linked clips totaling 13.9 seconds (removing 58% of the raw recording). Listening across the new cut points caught one subtle issue: a tiny two-frame tail of a deleted word bled into the start of the second clip. Asking Antigravity to trim two frames off the head of clip two cleaned up the transition without disturbing the rest of the edit.
4. Add word-level captions and fix homophones
Next, we turned on word-synced AI captions and asked Antigravity to inspect rendered frames for readability and speech-to-text accuracy:
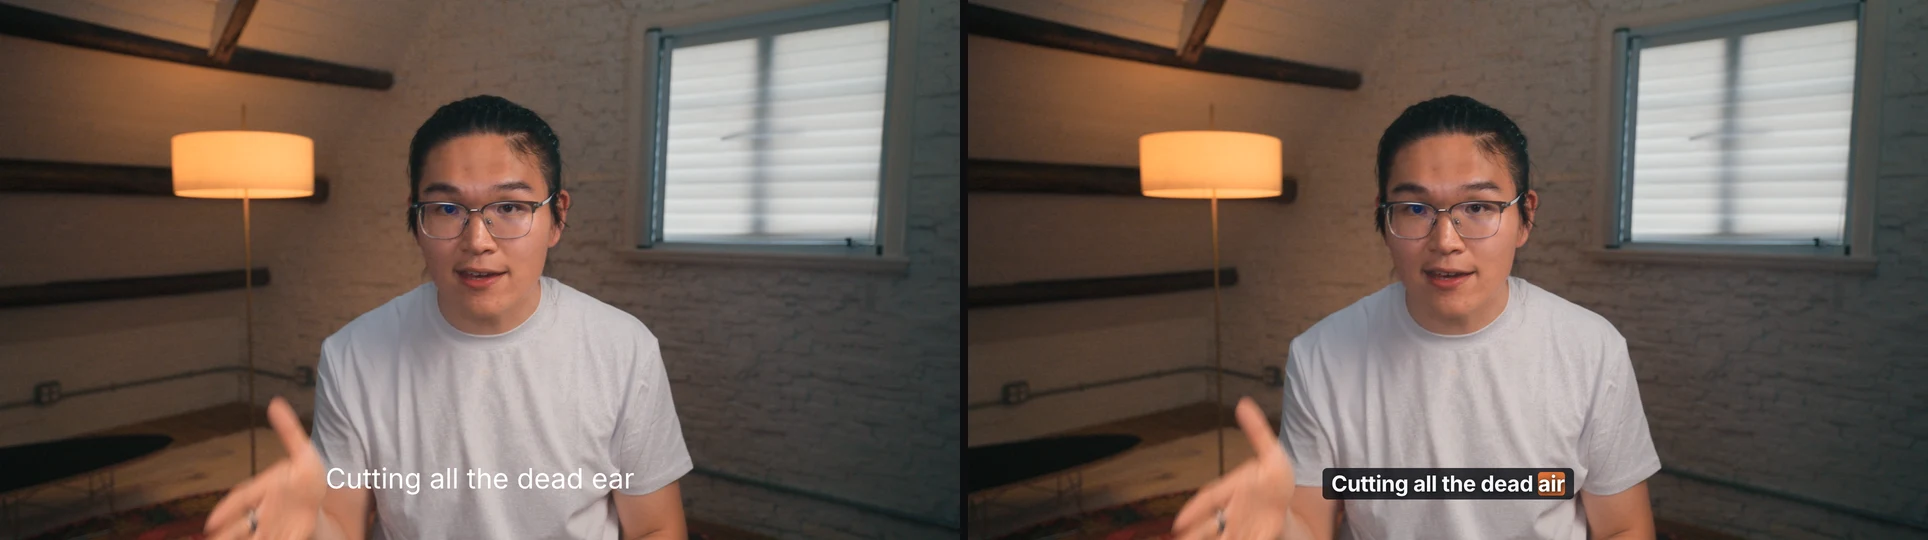
Sampling frames on the initial default caption pass surfaced two real issues immediately:
- Low contrast over bright wardrobe: Plain white subtitle text without a backing pill washed out directly over the presenter’s white studio T-shirt.
- Spoken homophones: Automatic transcription heard “Cutting all the dead air” as “Cutting all the dead ear”, and pluralized “look” to “looks” in the opening sentence.
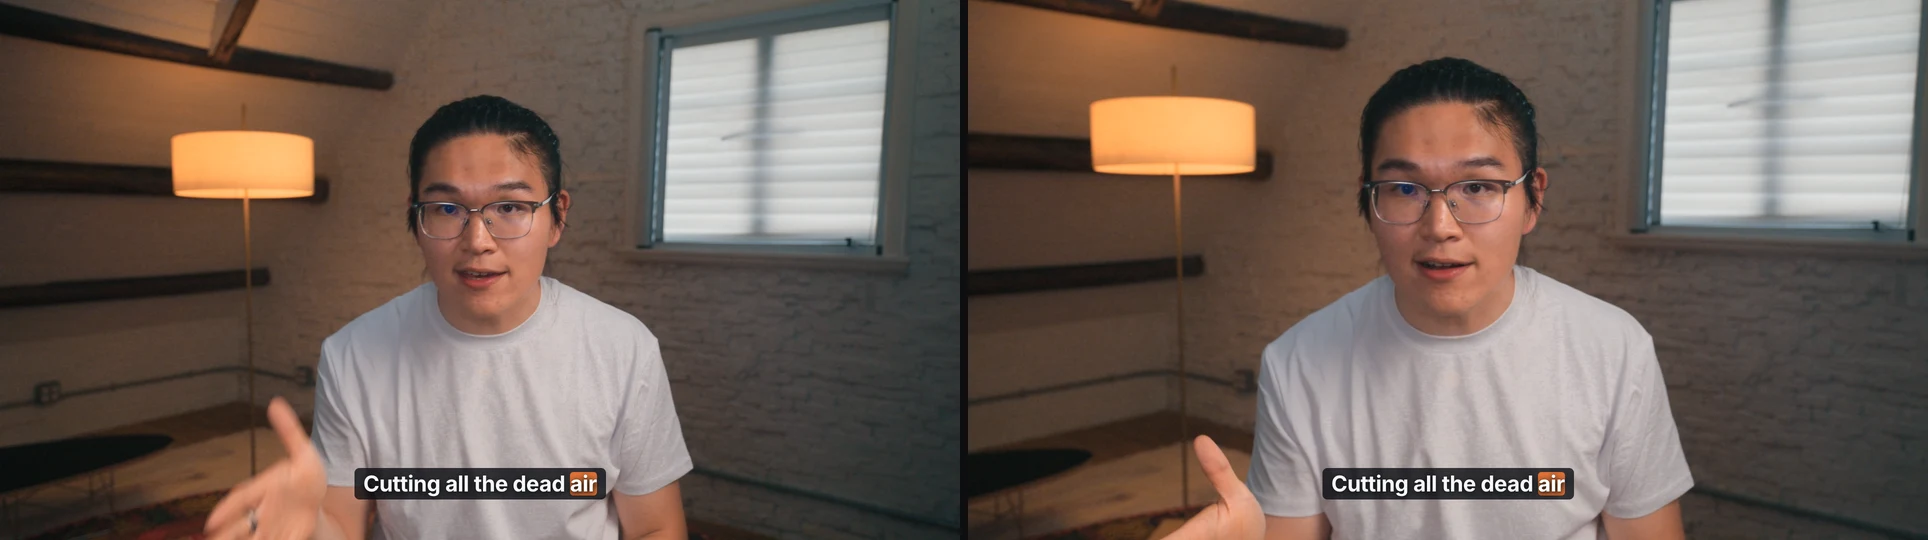
In a single pass, Antigravity corrected both caption cards and applied a rounded dark glass pill with crisp white lettering and a warm orange spoken-word highlight pill that stays legible across every frame (aligned with W3C caption readability guidance).
5. Finish the A-Roll with punch-in zooms, transitions, and sound effects
Before adding any overlays, we finished the spoken edit with a restrained camera push, a smoothed topic transition, and one subtle audio cue:
Because our camera file was shot in 3840×2160 4K inside a 1920×1080 timeline, scaling the final takeaway segment to 1.16x tightened the presenter’s framing with zero softness. Antigravity also added a brief cross-dissolve with a constant-gain audio crossfade across the topic change and pulled a clean low whoosh from ChatCut’s built-in sound library onto a dedicated sound-effects track.
That locks the A-Roll. Every spoken word, caption card, and camera emphasis point is now in place, so B-Roll layers can sit cleanly on top.
6. Add App Promo Motion Graphics and iterate twice in chat
To frame our presenter walkthrough like a polished software launch video, we drew on the dark kinetic aesthetic from SaaS Kinetic Type Launch in the ChatCut Skills catalog and asked Antigravity to build three coordinated Motion Graphics using our saved Design Style and real chatcut.io screenshots:
Antigravity wrote and imported all three editable graphics onto the timeline for 0 ChatCut credits. Rather than accepting the first render blindly, we ran two conversational iterations after inspecting frames in the Viewer:
That first revision nailed the brand palette and copy, and frame inspection caught two small layout details worth tightening: the uppercase label inside the orange action pill sat slightly below vertical center, and on the closing CTA card the pointer arrow rested right on the edge of the green connected badge after clicking. One short second prompt fixed both:
7. Generate a B-Roll cutaway and thumbnail you did not film
Around 9 seconds into the edit, the presenter discusses studio lighting across a jump cut between clips two and three. We had no second camera angle from the shoot, so we asked Antigravity to check the credit estimate first and then generate both a 5-second 1080p dark-studio cutaway with Seedance 2.5 and a matching 16:9 YouTube tutorial cover with GPT Image 2.6 Flare:
Antigravity reported exact pre-run quotes before submitting either job: 13.50 credits for the native 1080p 5-second Seedance 2.5 video (AI video generator, paid plan required) and 0.15 credits for the GPT Image 2.6 Flare thumbnail. Placed picture-only on the upper video track with gentle six-frame edge fades, the cutaway hid the presenter jump cut while echoing the warm tungsten lamp and cool window tones of our studio footage. (When you want to modify or extend an existing clip rather than generate a fresh cutaway, ChatCut’s video generator also includes models such as Gemini Omni 1.1 Flash; see our Gemini video editing test for how generative clip edits differ from timeline cutting.)
8. Layer auto-ducked background music and a closing AI voiceover
Our closing CTA card needed a spoken sign-off that was never recorded in the studio, and the full 22.7-second demo needed subtle forward momentum without competing with the presenter’s voice. We asked Antigravity to generate both audio layers and configure automatic ducking:
The 5.2-second English voiceover cost 0.07 credits, and the AI instrumental music bed cost 0.22 credits. Antigravity configured the music track as a ducking follower beneath the dialogue anchor track, so the pulse plays clearly during the 3-second kinetic opener and automatically dips by 14 dB whenever the presenter or closing narrator speaks.
Inspecting the closing frames caught one practical detail worth knowing: because our caption track was bound to the main dialogue track, placing the new closing voiceover onto that same dialogue track automatically created two subtitle cards right over the full-screen install prompt card. Deleting those two end-card caption blocks kept all presenter captions intact while leaving the closing graphic completely clean.
9. Inspect the full timeline and export locally (MP4 or XML)
Before rendering, we asked Antigravity to validate the project, sample frames across every section, verify loudness, and export both a finished 1080p MP4 and an editable XML handoff:
The integrated mix measured -18.3 LUFS with a clean -0.7 dBFS true peak, and local rendering produced a 7.8 MB 1920×1080 30 fps H.264 MP4 (export guide, with up to 4K local export supported on desktop) alongside an FCP7 XML timeline handoff for Adobe Premiere Pro or DaVinci Resolve.
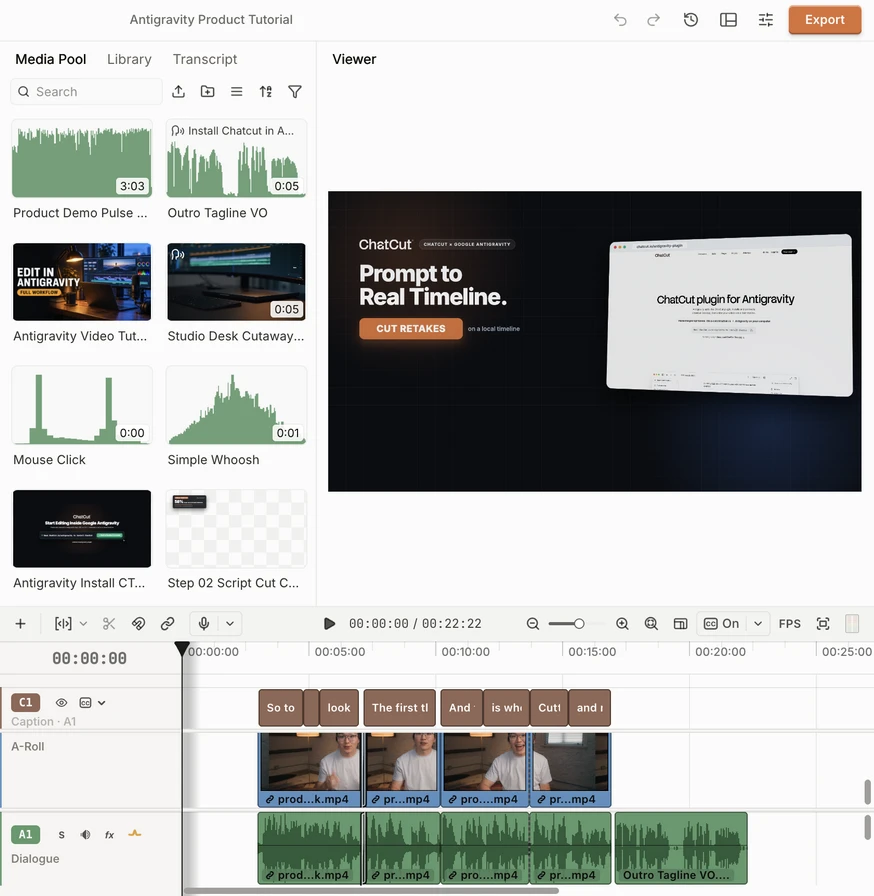
Tools Antigravity called in this run: create_project, target_project, web_browser, push_asset, manage_design_style, trigger_transcript, read_script, apply_script, find_transcript, edit_captions, split_item, edit_item, browse_library, edit_track, estimate_generation, submit_video, submit_image, manage_voice, submit_voice, submit_music, track_progress, validate_project, preview_timeline, export, and read_billing.
Here is the exact ChatCut credit ledger reconciled at the end of our session:
| Workflow stage | What ran | ChatCut credits |
|---|---|---|
| Steps 1 to 5 (A-Roll) | Project setup, brand capture, 4K import, cloud transcription, script rough cut, word-level captions, 1.16x zoom, dissolve, library SFX | 0.00 |
| Step 6 (Motion Graphics) | 3 custom App Promo Motion Graphics + 2 conversational design/timing iterations | 0.00 |
| Step 7 (Generated B-Roll & cover) | Seedance 2.5 native 1080p 5-second video (13.50) + GPT Image 2.6 Flare 16:9 thumbnail (0.15) | 13.65 |
| Step 8 (Voiceover & music) | English closing AI voiceover (0.07) + AI instrumental music bed with auto-ducking (0.22) | 0.29 |
| Step 9 (Audit & local delivery) | Timeline validation, 12-frame + LUFS inspection, local 1080p MP4 render, XML timeline export | 0.00 |
| Total | Complete 22.7-second product demo tutorial + YouTube thumbnail + XML handoff | 13.94 |
Copyable Antigravity prompts for common video workflows
Once chatcut_desktop is connected, you can reuse the staged workflow above across other formats (or pair these briefs with our product demo video guide). If your team also works in other desktop coding agents, compare the parallel setups in how to edit video with Claude and how to edit video with ChatGPT.
Product demo or feature launch video
Talking-head tutorial cleanup
Long walkthrough to vertical Shorts
What Antigravity still needs you to check before publishing
Even with frame sampling and loudness tools, an agent edit is a first-class draft rather than a blind autopilot render. Always check five details that surfaced during our own run:
- Clipped syllables at tight script cuts. When two takes sit close together in the recording, a couple of frames from a deleted word can bleed into the next clip’s start. Listen across every cut boundary.
- Homophones and product names in captions. Speech-to-text models routinely swap sound-alike phrases (“dead ear” for “dead air”) or lowercase brand names. Read every caption card once.
- Caption contrast and end-card overlap. Verify captions against bright clothing or white browser screenshots, and delete any auto-generated caption cards that land on top of a full-screen closing graphic.
- Badge alignment and cursor paths in Motion Graphics. Sample mid-animation and settled frames on custom graphics to confirm pill labels sit centered and animated cursors do not cover call-to-action text.
- Independent playback of the exported MP4. Open the rendered
.mp4file outside ChatCut in QuickTime or VLC to confirm resolution, frame rate, audio sync, and the final frame before uploading.
Troubleshooting Antigravity video editing
If Antigravity cannot see ChatCut tools or complete setup, match what you see to the fixes below (full setup reference in Edit a Desktop Project from Your Agent):
| Symptom | Cause | Fix |
|---|---|---|
| Antigravity says “not currently available in your location” | Google account or region does not yet have Antigravity access | Stop there; account and regional eligibility must be enabled by Google and cannot be bypassed by plugins |
| Plugin installed, zero workflow skills appear | Installed the repository root instead of the Antigravity subdirectory | Re-run Read ChatCut.io/antigravity to install ChatCut so agy installs the antigravity-desktop subdirectory |
Setup reports missing chatcut-mcp launcher | ChatCut Desktop was installed but never opened once to finish initialization | Launch ChatCut once from Applications (macOS) or Start Menu (Windows), sign in, then re-run agy mcp list |
chatcut_desktop tools missing in chat | You continued the conversation that ran the install prompt | Start a new conversation; in the App or IDE, open Customizations -> Installed MCP Servers and click refresh first |
| Want to disable or remove the plugin cleanly | Testing finished or resetting configuration | Run agy mcp remove chatcut_desktop and agy plugin uninstall chatcut-desktop (your local .chatcutproject files remain untouched) |